

by Mark JW Graham – Vocal Coach in Nottingham, UK
Book Now
A few years ago, I made this guide on putting together a recording studio together for under £500. I update that guide a couple of times each year to reflect any changes in approach, or bits of tech that I’ve found that work well.
This guide is actually one of the most read articles on my site. Many clients (and even people who call me) tell me that they’ve found this starter guide helpful to get their studio together.
But what about next steps?
What if you’ve already got some basic recording equipment, monitors, a computer, a microphone, headphones, etc. What are the next things one should look at to improve their studio space for recording?
That’s what I want to cover this week. Let’s say you’ve got some more cash, maybe £100-£500 you’re happy to invest into your studio space, what would I recommend as a good upgrade?
Fortunately, the first few suggestions are almost entirely free to do, so keep reading to find out more.
1) Room EQ Wizard + Omnidirectional microphone
The biggest problem with most recording spaces is the room itself.
Different rooms sound different to sing or listen to music in. I’m sure you’ve all experienced how echo-ridden certain rooms can be, and how other rooms can be exceedingly dry sounding. This is down to the dimensions of the room, and the reflectivity of the surfaces (hard or soft furnishings) that affect how sound bounces around inside it.
Hard surfaces and larger dimensioned rooms allow sound to bounce around for longer, which is (broadly speaking) what leads to the perception of reverb in a room. Think of how long sound seems to hang around in large stone cathedrals, vs your spare bedroom/office which probably sounds unnaturally dead to speak/sing/make music in.
Your room colours the way you hear your voice and your music.
Fortunately, with a little bit of analysis, we can MASSIVELY improve how our room sounds with minimal effort and cost. The first step we need to take, is to identify in what way your room is behaving.
Enter: Room EQ Wizard (REW)
This is free software that enables you to use a special kind of microphone to measure how your room bounces sound around. From there you can identify issues with your room, and then create solutions. If you have ever felt the room you sing or record in sounds dreadful, this should excite you!
Here is a link to the microphone I purchased to test my room over the last few years: Behringer ECM8000. You WILL need this microphone or an equivalent one to do your tests.
How it works
The short version is, you plug this measurement microphone into your audio interface (mentioned in part one), instruct REW to send frequency pulses through your speakers, and the microphone measures the result. You ideally want to place the mic in a central position in front of the speakers and always measure from that exact spot.
The pulses sound like weird sweeps to us, but it helps the software identify and graph accentuated/diminished frequencies. Here is what I got when I first measured my room:
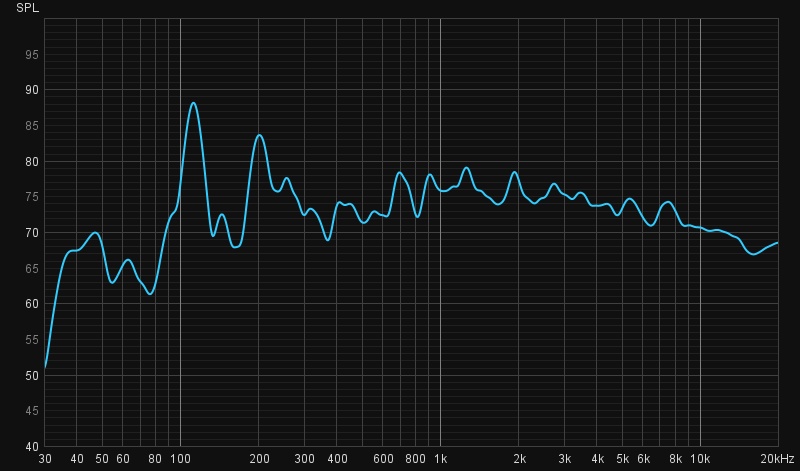
Put simply, the flatter your graph, the better. You can see my room had a graph that was anything but flat, with lots of peaks and nulls, where certain frequencies are too prominent, and others are getting notched out. This dramatically affects how music is heard and perceived in the room.
The long version: REW is a powerful bit of software if you really want to fiddle with it. Rather than explain EVERYTHING in detail here, I’ve included this link to a comprehensive tutorial to using Room EQ Wizard (or REW). But just plugging in the mic and generating those sweeps will get you 90% of the way there.
2) Use Room EQ Wizard to position your speakers better
A simple way to improve the sound within your room is to reposition your speakers. While you could do this using your own ears, this is hard to do, which is why I recommend people use software like REW.
Where you position your speakers in your room will affect how the room is driven by those speakers. This in turn accentuates or diminish certain frequencies in the room. So by moving speakers we can passively equalise how our room responds, even in a sub-optimal room. For example, by positioning speakers closer to walls, you can boost bass. By moving them further away from walls, you can decrease bass. The same is true for other frequencies.
How to start
You don’t need to do anything super-complicated here. The simplest thing to do is this: take a measurement, then move the speakers in some way, and take another measurement. Something will change in the graph. If that is a BETTER change and the graph is flatter, then do more of whatever it was you changed. If you’ve made it worse, then do the opposite of whatever you’ve done. It is very much trial and error, but you would be amazed how quickly you’ll be able to home in on a better speaker position via this method.
The problems I solved this way
When I started using Room EQ Wizard, I found that there was an ENORMOUS amount of sound lingering in the room around the 120Hz mark. You could hear that frequency resonating in the room to a ridiculous degree whenever I played that frequency through the speakers (Room EQ Wizard allows you to play specific frequencies to test how the room behaves at said frequencies).
But here’s the crazy thing: I tracked this issue down to be worst in the right speaker. It was likely due to it being a particular distance from a certain wall, which caused it to accentuate that 120Hz frequency. So I moved the speaker approximately 7cm to the right – and the resonance problem I was encountering almost completely disappeared.
Just by measuring the response of my room, I was able to identify the issues, track them down to specific sources, then make simple (free) adjustments to improve the response. This is what my room looks like now – note how incredibly flat it has become:

70% of this was mostly done by positioning my speakers differently, 20% was done by tweaking the controls on the speakers (e.g. bass, mid-frequency controls, etc) to, and the last 10% was done with the last step below. You will be able to solve a lot of the issues REW shows you by repositioning your speakers, but not all of them. The following is at least one extra option you would do well to explore.
3) Acoustic Treatment
Hard surfaces are the worst, as they reflect almost all frequencies in a given frequency range. Soft furnishings (e.g. sofas, rugs, curtains, canvas pictures, etc) dampen certain frequencies. The thicker the item and the softer it is, the more of the frequency range it absorbs.
Acoustic treatment can take a lot of forms, but generally takes the form of large thick panels that absorb sound across a range of frequencies. This helps tamp down the reflections (across whatever frequency range the treatment is useful for) and in turn, reduces the reverberation and should smooth out the room response.
Now this is where we have to talk about the intended function of a room. If I were EXCLUSIVELY recording music, mixing, mastering, etc, then I would need a LOT of acoustic treatment to get my room to a very low reverb level. But while I do record myself and others, my primary goal is to make the room sound great to sing in and aesthetically pleasing to boot. This requires some reverb, and therefore I need to be very strategic with my treatment.
In my case, I purchased a singular panel from GIK Acoustics, an International acoustic treatment company with a base here in the UK. The worst spot in my room is the alcove where my upright piano sits. It focuses all the piano sound up and back into the room, and also causes undesirable high frequencies to bounce between the two narrow walls. Here’s a photo so you can understand where it sits above the piano. I also opted for the same colour as my walls to make it as visually unobtrusive as possible.
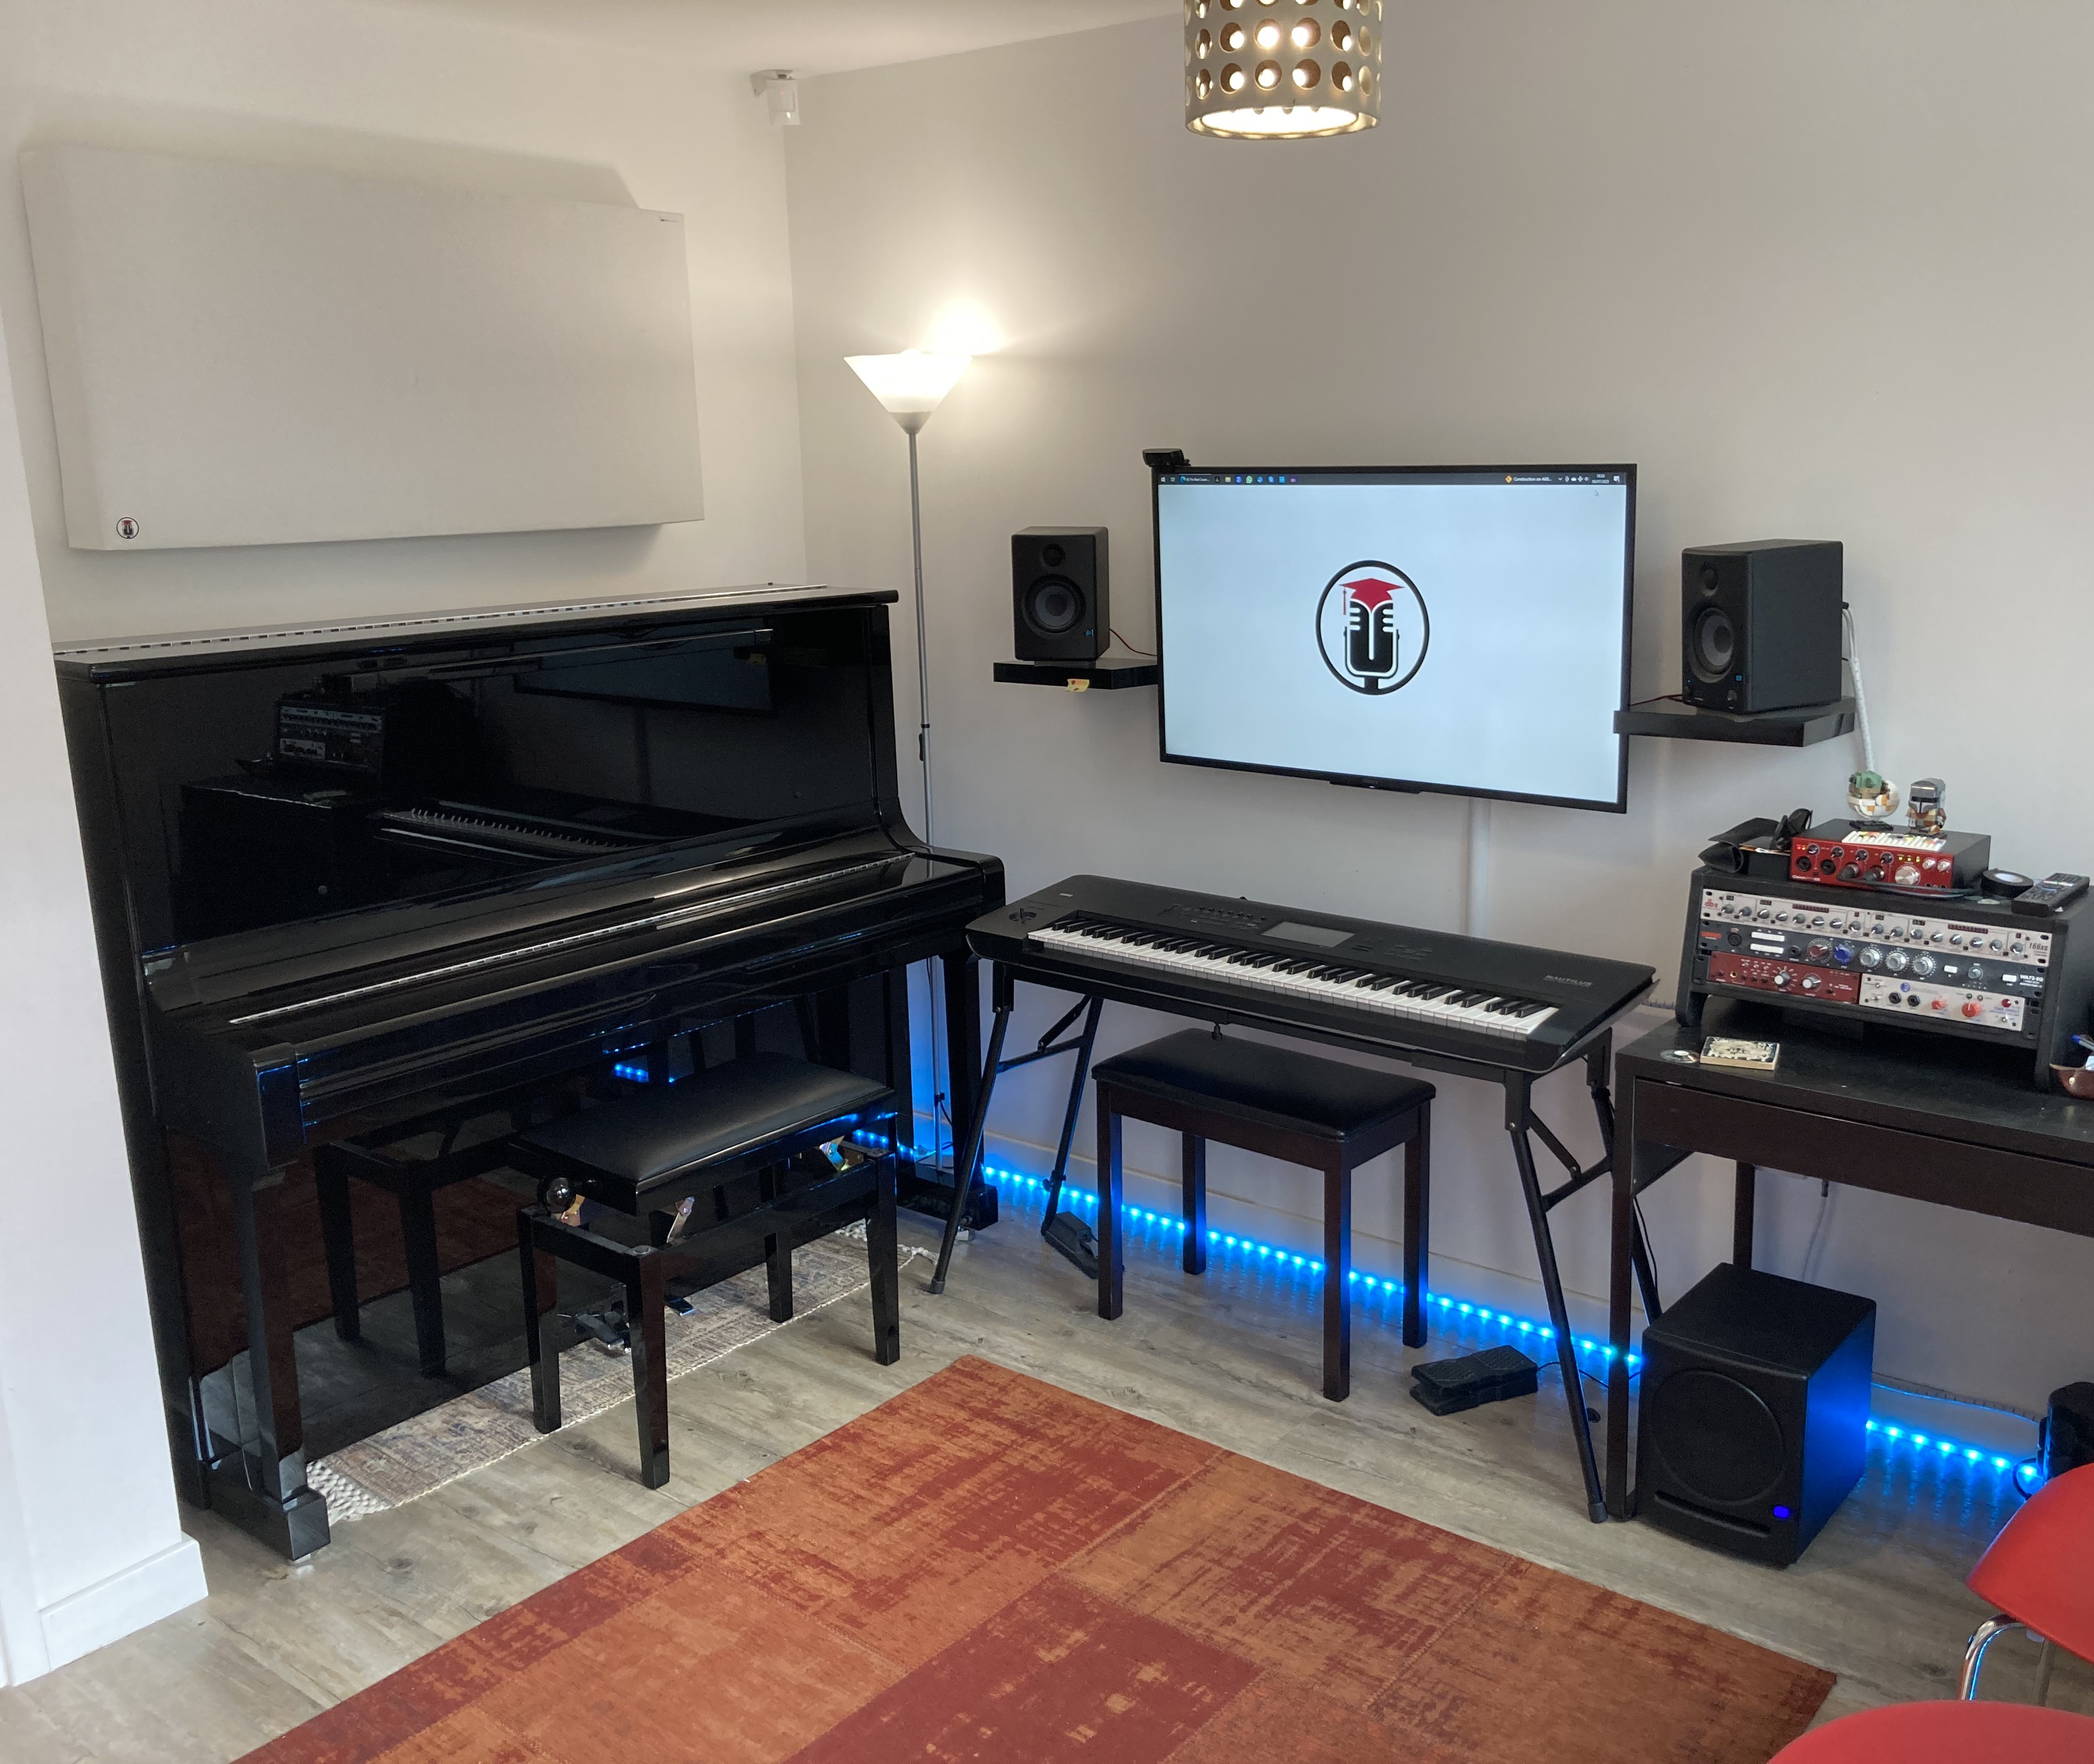
By placing that single super thick panel above the panel, the reflections are disrupted, and these issues are diminished. It’s incredibly simple, but this one panel helped address LOTS of high frequency noise that was undesirable in this room. While I will still likely add more acoustic treatment, I will do it bit by bit rather than add lots more panels right now.
You may need more panels than I have, but you can always try moving some soft furnishings into your room to test this out before spending money on more bits of equipment. I had one client for a while who had bought TOO much acoustic treatment, and his room still sounded dreadful to his ears. Getting the analysis first and making slow iterative improvements is the better (and more cost effective!) way to go.
Conclusion
The only money I spent to go from that hilly looking graph to that extremely flat looking graph (which sounds AMAZING, you should hear it!), was to buy a cheap measurement microphone, and eventually buy that single acoustic treatment panel. I think it cost me £130-140 total to achieve this.
What this creates is a VERY flat response room to listen to music in, to sing in and to record in. There’s enough reverb to be enjoyable to sing in, but not so much that it negatively affects recordings. It enables you to hear things you could never hear before in your music, and to identify issues in your mixes that you would never have noticed before. Moreover, once you get used to what a (reasonably) flat room sounds like, it makes it much easier to critique music or other listening systems you may encounter, as you have a “home-base” to refer back to.
If you would like to improve your voice and the recorded music you’re producing, this will go a long way to helping you do that. Even if you just want to improve the listening environment you enjoy music in, this will help enormously.
This is also something I’ve helped recording clients with during sessions, so if you would like help figuring this out, this is also something we can cover in sessions. You can book your first session in via our booking form right here.
The Sunday 6PM Technique Drop
One high-impact vocal technique insight, every week.
Suggested Reading

Mark JW Graham - Mark is a high-end vocal coach and singing teacher based in Nottingham, UK.
Certified in Speech Level Singing ®, and with over 20 years of musical experience, he is known as the "go-to vocal coach" for singers wanting dramatic improvements in their singing voice in a short space of time.
Trusted by singers worldwide, Mark’s expertise as a coach, singer and musician helps clients transform their voices and raise their musicianship to new levels.
SLS Certified Vocal Coach · 20+ Years Experience · Trusted Worldwide